AI Agent Coding for Admins
Like many of you, my first real exposure to AI was when ChatGPT dropped. I spent way too much time prompting it with random stuff, used it for some PowerShell, and tried out the voice feature when that launched. Mostly, I’ve used AI for things like writing docs, double-checking my grammar and English, and making some funny pictures.
Right before DeepSeek R1 came out and shook things up, I started messing around with AI agent coding using Aider. But I quickly realized I didn’t have enough time to really get the hang of it. Then DeepSeek R1 launched with ridiculously cheap API pricing, so I decided to give AI coding another shot, but this time with a tool called RooCline (now rebranded as Roo Code). And honestly, that really opened my eyes on how powerful AI coding has become.
AI Coding Agents: What are they?
They write code for you, but that’s just the beginning.
AI agents do more than just autocomplete your code as they understand what you’re trying to achieve. They can refactor, debug, and even help design entire solutions. Whether they’re built into your IDE, available as a VS Code extension, or running in the command line, these tools make development more efficient and streamlined. What they share is the ability to select which AI model you want to route requests to, enabling you to choose the right model for a certain task.
Agents:
- Aider is a CLI-based tool that many consider the best AI coding agent available. However, it has a steep learning curve and can be challenging to get started with. That said, it manages context windows more efficiently than most, meaning you’ll likely spend less on API costs. Aider is free and requires you to use your own API keys.
- Cursor seems to be the most popular choice, though I haven’t tried it yet. It follows a subscription-based model ($20/month), giving you 500 fast premium requests per month to top AI models, plus unlimited slower requests. For what you get, the pricing seems solid.
- Cline lives in VS Code as an extension. The development is very active and it seems like Cline and Roo Code are very close in features all the time. It’s free and uses your own API keys.
- Roo Code also runs as a VS Code extension. It originally started as a fork of Cline but has since rebranded as its own product. The development pace is fast, with new features constantly being added. Like Cline, it’s free and requires your own API keys
- Windsurf works as an extension or using their own IDE. It works with a subscription based model.
- Github Copilot has been around since 2021, originally launching as an AI-powered autocomplete tool. Since then, it has expanded with a chat feature and an edit function. The newest addition, Copilot Agent, is currently available in the VS Code Insider release. I get the Pro license ($10/month) through work, so I’ve been testing it a lot, especially since API costs through Roo Code have been adding up. Is it on par with other AI agents right now? Not quite. But for the price, it’s a no-brainer.
- Claude Code also runs in your terminal like Aider. It’s currently released as a research preview by Anthropic and work with the Claude API. If you’re on Windows it must be run on WSL.
My recommendation would be to try Roo Code (GUI) or Claude Code (CLI), but don’t forget about Github Copilot if you already have the license. For the full hardcore experience go for Aider, but be prepared to spend some time to actually learn the tool.
Models:
Now there are a ton of models out there, but in the context of coding there are a few with available APIs that we can pick from. Aider has a good leaderboard that showcases these models.
- Claude 3.5 Sonnet has long been a top contender for raw coding performance, and the release of Claude 3.7 Sonnet has only made it better. However, costs can add up quickly as projects scale. This has been my go to for basically everything.
- OpenAI o3-mini offers solid coding capabilities at a very budget-friendly price point.
- DeepSeek R1 delivers impressive coding performance at a highly competitive cost.
All these models are amazing on their own, but they really shine together or with other reasoning models. There will be times when your chosen model runs into an issue it can’t solve and starts looping or making weird changes to your code. This is when it’s time to switch it up and ask for input from another model.
Roo Coding
This post will solely focus on Roo Code as the agent using Claude 3.7 Sonnet as the model. Roo can be installed from the VS Code marketplace.
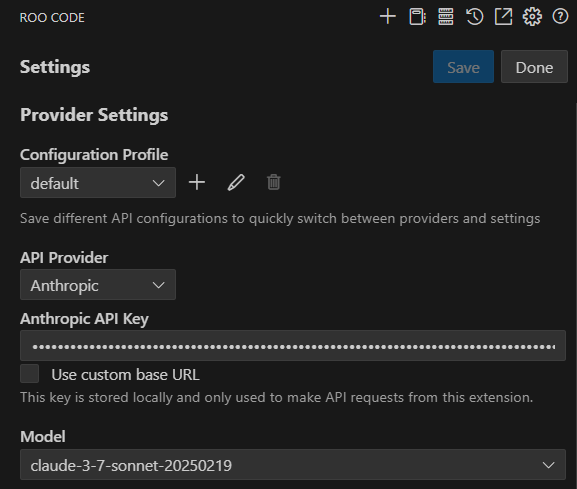
Below are the settings to select a provider and model in Roo Code. You’ll notice an API key must also be provided, which is the case for all other providers and models. The key is usually generated from your account settings of one of the providers (ChatGPT, Claude, etc.). Once generated, you’ll also need to add credits to your API account as that’s not included in the other subscription based services such as ChatGPT Plus or Claude Pro.
AI agents operate using something called context windows, meaning they can only “remember” a certain amount of information at a time when processing requests. The context window determines how much text/code, conversation history, or files the AI can consider when generating responses. At the beginning of a session, requests tend to be small, like making a quick edit to a file, then another. But as more files get added and the session history grows, the context window fills up. Over time, this can get pretty large, and once it hits the API provider’s maximum limit, your requests will start getting throttled. Some providers have different Tiers where you can get a larger context window by basically paying more. The context window can easily be reset by starting a new chat/session.
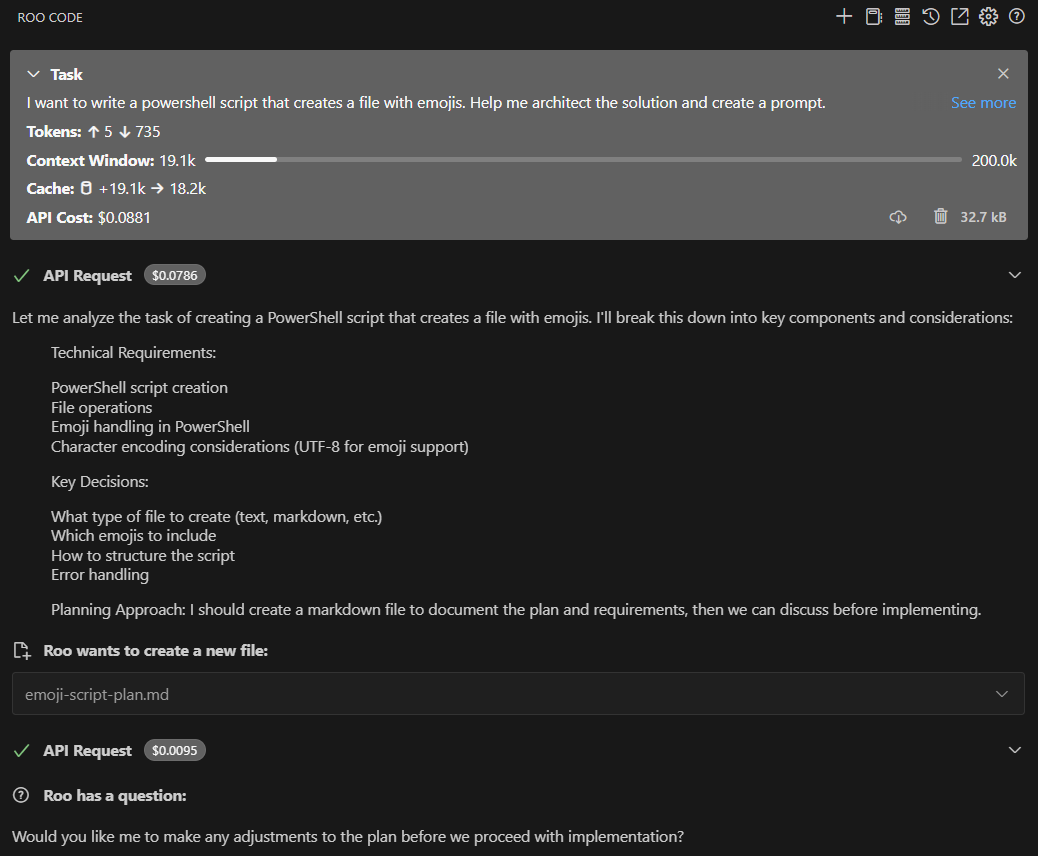
Below is an example showing Roo Code in its Architect mode where I send in a very simple prompt about creating a PowerShell script. Roo Code will analyze the task and present me with a markdown file containing the proposed solution and implementation steps. The extension will show the tokens spent for my prompt ⬆️ and the tokens spent for the response ⬇️, the context window and the API cost for my current session. The prompt from the screenshot generated this markdown file.
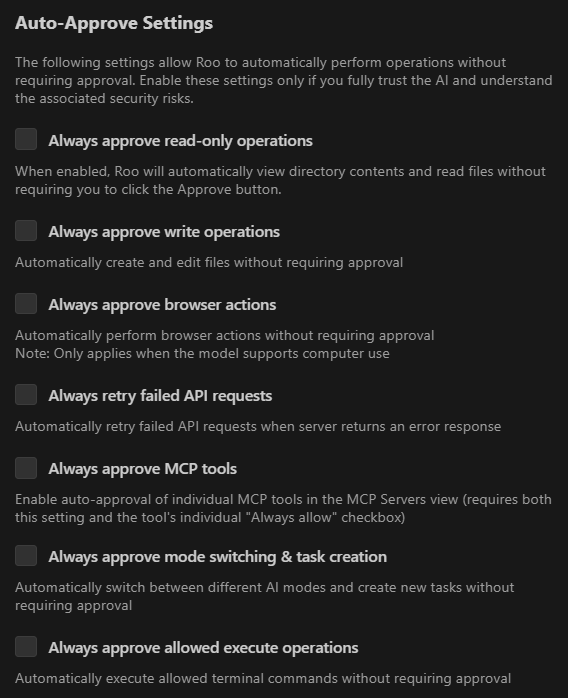
Auto-approve settings is where we can really go all-in! By default, the agent asks for approval before doing anything—reading files, editing code, creating new files, using the browser, and so on. But if we enable auto-approve, the agent can handle all of that on its own. That means it can write code, run it, troubleshoot issues by reading terminal output, and even fix its own mistakes—without us lifting a finger.
The first time you see it in action, it’s pretty mind-blowing. Now don’t get me wrong, it’s not perfect and it will make a lot of errors. I believe a lot of the potential today really depends on how the prompts are crafted, since the model’s coding capabilities are already quite strong.
The below demo picks up where the last prompt left off, where the agent was in Architect mode and came up with a solution. Now, the agent’s switched to Code mode, which means it’s ready to actually do the work based on the prompts. In this case, I’m asking it to read the markdown file it generated and start building the solution. Once the script is done, Roo will ask to run it in the terminal using the Run command feature, check the output, and fix any issues before running it again successfully.
Next up, I’m kicking off a fresh session, wiping the old context and history, and asking the agent to create Pester tests for the script. It’ll check out the files in the folder first to get a better feel for what kind of tests make sense, then dive into writing them.
This was just a quick example to show off the different modes, how handy auto-approve can be, and how the agent can troubleshoot and fix issues based on terminal output. The downside of auto-approve is that you lose some control, and the agent might tweak parts of the code that have nothing to do with your prompt. That’s why version control is important between edits, and it’s usually better to make lots of small changes instead of big ones all at once.
Model Context Protocol servers
Model Context Protocol (MCP) servers are able to supercharge your agents as they are able to connect to external tools and data sources. At its core, MCP acts as a smart intermediary. When you ask a question, like checking the weather or digging into customer data, the system figures out exactly which tools to call upon. It hands off the task to a large language model that decides whether to query a database, hit an API, or run a code snippet, then gathers the results and delivers an answer.
AI Agent Coding for Admins
I’m a sysadmin turned Azure Architect with zero developer background. My go-to tools are PowerShell, Bicep, and YAML pipelines. I can say with pretty solid confidence that if you start using AI agents in your day-to-day work, you’ll probably see a big boost in both your productivity and the quality of your code. On top of that, it’s been a blast to use! I’ve actually been having a great time building web apps with React and Node.js thanks to it.
Here are few things you can ask it:
- “Review the codebase and suggest improvements” — Open up a repo in VS Code and let it scan through and give you suggestions. If you plan to apply any of the suggestions, tackle them one at a time.
- “Add parameter validation to the scripts in the codebase”
- “Add detailed comments to MyBigScript.ps1”
- “Set up centralized logging for my scripts”
- “Add error handling to the functions”
- “Review the codebase and create detailed markdown documentation for the whole solution”
- “Document my pipeline in markdown and throw in a mermaid diagram too”
- “Refactor my codebase” - Asking it to refactor small or large codebases doesn’t usually end well, the prompt needs to be more specific.
- “Create a new HTTP trigger Azure Function using PowerShell that does XYZ” - Provide a detailed prompt of your solution and you’ll be surprised how well it does.
Workflow
The post is already becoming too long, but it’s an exciting topic! Let’s wrap it up with an example workflow.
You want to build a web app for a new business you’re thinking of starting. Parents can enroll their kids in beginner soccer play that’s hosted inside during the winter. Nothing serious, it’s just for fun.
First, head over to ChatGPT and pitch your idea. Ask for creative input; things like a name, slogan, mascot, and color scheme for your site. After a bit of back-and-forth, you’ll have a solid creative foundation to build on.
Next, create a new project folder (or repo) and open it in VS Code. In Roo Code, switch to Architect mode and describe your project using the summary from your ChatGPT convo. This is also when you define the tech stack. In this case, we’re going with React for the frontend, Node.js for the backend, and Azure SQL for data storage, since users will need to sign up to book activities. For internal use, we’ll also pull the latest indoor gymnasium prices from a municipality API. Be as detailed as possible here. If the architect mode doesn’t fully understand what you want, it might generate something totally off, and you’ll end up using extra API credits to fix it. You could also switch to Ask mode to help figure out what you need.
Once you send the prompt, the architect will likely generate multiple markdown files outlining the project, implementation plan, and tech stack. Review these carefully and make sure everything aligns with your plan.
If you’re happy with the plan, switch to Code mode and have it read the markdown files to start implementing the solution. It’ll help initialize the React project, install the necessary npm modules, and begin building out the web app. Depending on the project size, this could take a while. Use Code mode to troubleshoot any issues, using the terminal output and F12 for debugging.
When adding new features, switch back to Architect mode, describe what you want in detail, let it generate the markdown files, and then jump back into Code mode once you’re ready to implement.
Conclusion
Give it a try! It’s easy to get started and you’ll most likely see immediate returns. The rise of AI has been pretty amazing to watch and it’s only going to get crazier in the coming years, especially now that the US has some serious competition from China, and I wouldn’t be surprised to see big things coming from China as they’re really pushing in the tech innovation space.